How To Make Hydrographic Film By Yourself
Everyone finds it exciting to see three-dimensional (3D) printing on any materialistic object. That's where the hydro dipping technique comes on. By using a method with a hydrographic film, you can transfer any complex art pattern in the 3D version.
Additionally, the vivid color it gives to the object makes it more realistic and attractive.
On the other hand, doing a hydrographic design is quite simple and inexpensive. You can apply it to any material. All you need to have is a special type of film, and with the use of a water surface, you can print your own custom-made hydrographic film.
So, let's go through the step-by-step procedure on how to make hydrographic film by yourself. So, without further ado, let's jump in.
What kind of film do you use for hydro dipping?
You can apply a top-notch quality finishing on any OEM part by using hydro dipping film. Usually, there is a huge roll of Polyvinyl Alcohol (PVA) film.
On that, some special inks are generally printed. On the other hand, the film is usually water-soluble. That is why it starts to break down on water when floating. Additionally, that's when the activator chemical is applied.
There are various types of sizes available in hydrographic films. For instance, ½m, 1m, 1.3m widths, etc. You can use these sizes most efficiently in order to decorate the OEM products.
How to make a hydrographic film By Yourself? [Step by step guide]
Making your own custom-made hydrographic film is quite easy, to be honest. You just need to maintain some step by step procedures to get a suitable outcome of your hydrographic film.
But if you are confused about how to make hydrographic film by yourself, then no worries. Because we are here to explain you the process in a brief manner. Let’s get into it.
Step 1: Necessary items for custom hydrographic film printing
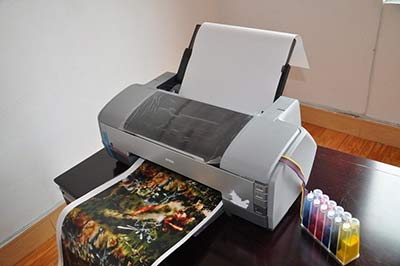
You’ll require only a few things for the process. These are Inkjet printer for hydrographic film, Blank film, Activator A, Water-based pigment ink, etc.

Step 2: Connect the inkjet printer with the computer
Connecting your computer with the inkjet is super easy. All you need to do is go through the manual guide and follow the instructions.
Step 3: Set the image on the computer according to the proper size
If your preferred size of the print is 1m×1m, then set the size of the image on your computer. Additionally, for printing repeated images of the same size, you need to keep splicing the image until you get a 1m×1m size.
Step 4: Time to check the printer & ink color
It's always good to go for a trial print design on a blank hydrographic film to check if the color combination and ink weather are appropriate or not.
Step 5: Print the hydro dip film
It's time to use the hydro dip printer in order to deliver your design on the hydro dip film. Be conscious while doing it. Because it's the main step for printing your design. If you notice any problem in color combination, stop and check the printer to fix it.

Step 6: Now go for drying out the ink
Usually, when you print continuously, the ink gets wet. Then it requires it to dry out naturally. In order to print a longer hydro dip film, it is suggested not to directly roll the blank film. In that case, put the film on the table and let it dry out for the outcome. Sometimes, a heating plate is used in order to dry the water transfer film.
Step 7: It's time to apply Activator A
When it comes to protecting the ink, we apply Activator A. You need to pick the printed black WTP film and apply Activator A to it. Then, dip the object following the water transfer printing method.
Step 8: Now Dry out the film with Activator A
Now, it's a very crucial part where you need to dry out the Activator A. Make sure you do it on the printed hydrographic film. Next, pick the blank hydro dipping film and package it.
Keep in mind that rolling the printed hydro dipping film before drying out may end up damaging ink. Then it will have no use at all. So, make sure you become extra cautious while doing this part.
Step 9: Roll the blank hydrographic dipping film
Now it's time to roll the hydrographic film. You need to package the custom-made hydro dipping film to turn it into a normal dipping film.
Step 10: Final result of custom made hydro dipping film
Finally, your custom hydrographic film is now a normal film that can be used for hydro dipping. Now you can just go for a hydro dipping design any time you want.
These are pretty much the order of making your own custom-made hydrographic film by yourself. We recommend you properly maintain the process for the best outcome.
How much does hydrographic film cost?
Examples of films: There are some trending hydro dip films available in the market. For instance
WTP-940 Sport Carbon
WTP-992 Super Wave
WTP-966 Gray Wood
WTP-1012 Grand Union, etc.
You can find them at a price range between $50 to $150.
Cost of the hydrographic film: The cost of hydro dipping varies based on various factors. For instance, if you want to hydro dip a vehicle wheel, it can cost around $150. At the same time, this costing can also vary up to 30% to 50% based on the labor fees, activator type, finishing, etc. However, you can buy a hydro dipping gun from $200 to $500 range depending on the model.
Cost of other accessories: On the other hand, gun accessories of hydro dip may cost between $50 to $200. There are some smaller materials that are also required to start hydro dipping. For instance, cups can cost around $30. There are some other items for instance wakeboards, water skis, etc that cost on an average $150 to $300 in order to hydro dip.
Final Thought
We are certain that now you are well aware of the step-by-step procedure on how to make hydrographic film by yourself. To be honest, making your own custom-made hydrographic film isn’t that hard at all.
All you need to do is properly maintain the process in order and keep in mind the dos and don'ts that are mentioned in this article. Make sure you conduct the whole procedure in a careful way in order to get the best outcome. After all, it’s your own creativity you are working on. So, do the best you can. Good luck!

