How To Heat Press A Hat – A Complete Guide
Thanks to the advent of heat press machines, items like hats that were seemingly impossible to print on can now be easily personalized with your business logo, image, text, or any other design of your choice.
To heat press a hat, you can use a standard heat press machine or you can get a heat press with a special hat press. The latter makes the whole process much easier and faster.
Discover our step-by-step guide below on how to go about personalizing hats with your desired designs using your heat press machine like a pro.
How Do You Press a Hat with a Heat Press?
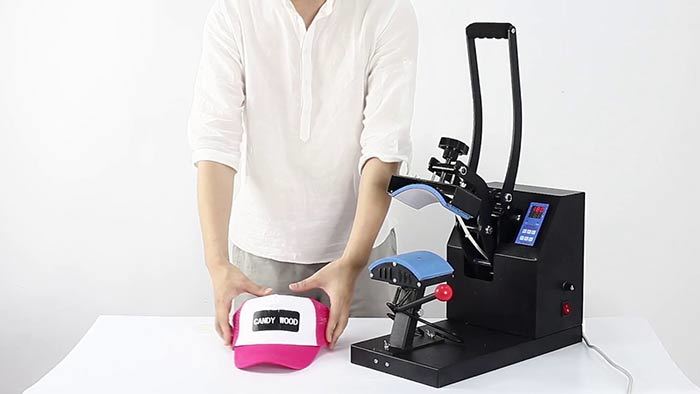
Using a heat press with hat press is the easiest method to personalize your hat. This is because it has a specialized arm, with a curved platen design, specially designed for handling different types of hats for easy transfers.
What you’ll need for this project:
- Heat press machine with hat press arm
- Heat transfer paper (HTV vinyl paper works great for hat pressing but you can still use transfer papers if you want to)
- Weeding tool (can be craft knife or scissors)
- Cutting mat
- Hat
Step By Step Guide For Heat Press Hat:
Step 1. Prepare Your Design

Before everything else, you need to come up with a design that you plan to transfer to your hat. This part is going to be fun!
You can use an existing design or you can get creative and come up with your own design from scratch with the help of graphic software.
Be careful with your design calibrations as the measurements of the design represent the size you’ll eventually print on your hat.
Once you have finished working on the design, print it on paper and then trace it onto a heat transfer vinyl.
Alternatively, you can create a design using an electronic vinyl cutting machine which lets you design as well as cut design. This option is much easier as it saves you from the weeding process in step 2 below.
Step 2.Cut and Weed Your Design
If you went with the method of tracing the design on the HTV paper, you’ll need to apply this step.
Otherwise, if you use an electronic vinyl cutter, you can skip this step as your design is ready for pressing.
Simply lay your design on a cutting board and use your cutting tool to cut it out. Then, weed the design to remove the excess vinyl that you don’t want to appear on your design.
Don’t forget to MIRROR your design to ensure the print comes from the right side up on the hat and not backward.
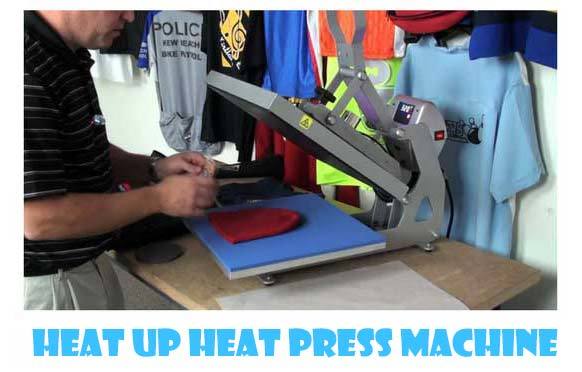
Step 3.Heat Up Your Heat Press Machine
Now that your design is ready for transferring to the hat, it’s time to fire up your heat press machine.
This part is as simple as plugging it in and powering it on and then setting the timer settings depending on the type of heat transfer vinyl you’re using.
Once you key in the right temperature setting, wait for your machine to heat up to this temperature. It should take around 5-10 minutes, though the actual heating time will depend on the machine you’re using.
You should also set the timer at this point according to the HTV manufacturer's specifications.
For standard HTV like Easyweed, the settings are about 305 °F for 20 seconds, medium to firm pressure. While for Specialty HTV like glitter or Flock HTV, the heat setting is about 320°F with a time requirement of 20 seconds comes with a medium to firm pressure. Fabric and canvas hats may stand the heat, but hats such as straw hats are a bit heat sensitive.

Step 4. Put the Hat in Place
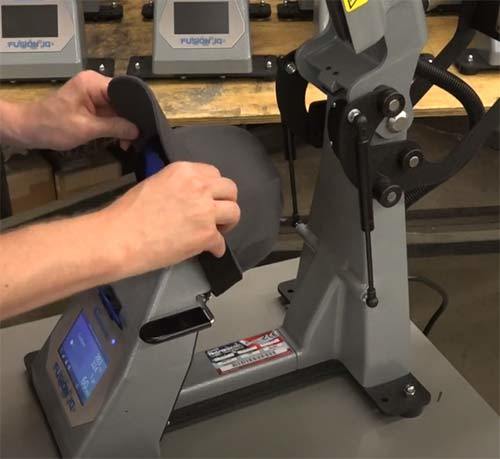
With the machine all set and ready, slide your hat in place and secure it with a handle so that it doesn’t move. This will ensure accurate printing results.
Next, you’d want to set your design on top of it and make fine adjustments to it so that it sits exactly where you want your design to appear when you finally press it.
Step 5. Press it!
Finally, press the heated platen down and onto the hat. The timer will start immediately after the upper panel is locked into position in most cases.
Leave the machine to do its job and watch as the digital timer ticks.
You’ll be notified by a long beep (most machines do this) when the time is up. And at this point, you should lift the heated panel to end the process.
Get your hat off the press and peel off the carrier sheet so that you’re left with the final print
How to Heat press a Hat Without Attachment:
Some hats can be easily printed on with a standard heat press machine. In case your heat press machine doesn’t come with the hat press arm, you can still use it with just a few modifications to help you personalize a hat.
If you’re a business person, however, the best bet is to invest in a special hat press as it’s much easier and faster to use for hat printing.
What you’ll need for this project:
- Regular heat press
- Teflon sheet
- Thermal tape
- Heat transfer vinyl (use glitter or flocked vinyl). Standard heat transfer vinyl isn’t recommended for this method because it’s too thin and will wrinkle easily if you move your hat on the heat press.
- Rubber band
- A thick piece of fabric or oven mittens
- Hat
Instructions:
Step 1.Get Your Design For Transfer
As usual, start by creating a design to be printed on the hat with the help of suitable software and then cut it out and weed out the excess parts. or you can use vinyl cutting software to print and cut your design.
Step 2.Prepare The Heat Press Machine
To prepare the heat press machine for printing, line this heating panel with a Teflon sheet. This step is important as it helps protect your hat from sticking onto the heating element and getting burnt. needless to say, this will damage your hat and leave you with a hell of a cleaning job to do on the heating element.
Have a look On: Mophorn Hat Press Machine
Step 3. Heat up The Machine
With the heat press in place, you can power on your machine and let it heat up. For this method, you won’t be keying in any temperature and timer settings recommended in the heat transfer vinyl user instructions.
Step 4. Put Your Design on The Hat
Now is time to put that design on your hat where you want it to appear when you finally print it. Be sure to finely adjust its position so that the design will come out more accurately. Remember to secure the design in place with thermal/heat tape.
Step 5.Prepare the Hat for The Transfer
You can’t place the hat on your regular heat press as you do your shirt as you’ll end up damaging it. Instead, you should hold and press hard your hat as the transfer takes place. Putting a thick piece of fabric inside the hat will give you a safe place to hold onto as you keep your hat in position for the transfer. If you can’t find a thick fabric, you can put on oven mittens to help you safely hold the hat.
Step 6. Put the Hat into The Machine
Now that you can safely hold the hat, put it into the heat press machine, on the heating element you lined with Teflon sheet in step 2. Press the vinyl on the HTV carrier sheet onto the heating element.
Hold your hat in position and make sure it gets evenly heated. If you suspect the design isn’t getting heated uniformly, start with the center and make your way towards its edges.
Step 7. Remove the Hat from The heat
Once you’re confident that a full transfer has successfully taken place, remove your hat from the heating element and let it cool for a few minutes before peeling off the backing sheet. And you’re done!

Other Frequently Asked Questions About Heat Pressing a Hat:
Now that we have already discussed the hat pressing process, you might be asking yourself additional questions concerning heat pressing a hat like how long it takes to press a hat, what temperature setting to use, and so on.
What Temp do You Heat Press a Hat?
The right temperature for heat pressing a hat depends on the specific type of heat transfer vinyl you’re using. You’ll find that most of the standard heat transfer vinyls usually require a temperature of 305 degrees Fahrenheit for a successful pressing.
That said, the manufacturer will always indicate the recommended temperature for their HTV, so you should be able to know the right amount of temperature by just reading the manufacturer instructions.
Be sure to consult your HTV user instructions to ensure you set your heat press to the correct pressing temperature for high-quality transfers.
How do You Heat Press Vinyl Onto a Hat?
The time it takes to heat press vinyl onto a hat also depends on the type of heat transfer vinyl paper you’re using for your project. For the standard HTVs, the timing usually falls around 5-7 seconds.
Just like temperature, we advise you to consult your HTV user instructions on the right timing settings to use to ensure you give your designs enough time to be correctly transferred to the hat.
How Long do Heat Press Hats Last?
Hats pressed using heat transfer vinyl for up to 50 washes or more. However, the actual lifespan of your hat will depend on the amount of care you accord it.
To help extend the lifespan of your heat press hat, you should avoid washing it immediately after the transfer process (wait for at least 24 hours to give your design time to settle). Avoid using hot water to wash your hat.
Also, avoid using hard detergents during cleaning as they can damage the print. Go for air-drying method as opposed to tumble-drying.
Conclusion
Heat pressing a hat isn’t that hard when you have the right equipment in place and know the exact steps to follow. It gets even easier if you’re using a heat press that comes with a special hat press platen. If you don’t have this special hat press, however, you can use a regular heat press machine to get the job done.
Having discussed how to successfully heat press a hat using both methods, it’s our hope that you now have the knowledge and confidence to make your fast successful hat pressing.


