How To Remove Screen Print From Cotton Shirt [ 4 Proven Methods]
Screen printing is quite a labor-intensive process and you can easily make errors along the way if you’re not careful. Mistakes aren’t just for inexperienced printers. Even seasoned screen printers make errors from time to time.
If you messed up when working on your clients’ orders or on your own t-shirts, we’ve got your back. Below, we will show you how to easily remove screen print from a cotton shirt using various methods.
4 Proven Methods to Remove Screen Print from Cotton Shirt:
The methods we’re about to list here will help you easily remove screen print ink from your cotton t-shirts. The methods use different types of materials and supplies within your house and are generally easy for you to execute.
1. Remove Screen Print with a Plastisol Remover
Plastisol remover is one of the most trusted products for removing screen print ink from t-shirts. It does an effective job at getting off the ink and leaving your shirt as it was in pre-print condition.
However, this stuff is quite strong and we recommend you to only use it in an area with good ventilation. Also, make sure you put on some gloves to protect your hands/skin as well.
Step by step guide on using plastisol remover for screen print ink:
Step 1. Apply the plastisol remover to the problematic area
If you’re dealing with a large area of t-shirt, apply the plastisol remover product on it and leave it to work for up to 30 minutes. If you’re dealing with a small spot, apply the remover on a soft cloth and then dab it (the soft cloth) on the t-shirt repeatedly.
Step 2. Brush the print off the shirt
After the waiting time is over, most (if not all) of the print on your shirt should have detached from the shirt fibers. Use a soft-bristled brush to gently brush the ink off with gentle strokes. This will help loosen it up for easy removal.

Step 3. Wipe off the remaining plastisol remover
Now wipe off any remaining plastisol remover on your shirt and proceed to wash it with cold water. You’d want to use a gentle detergent for the washing or simply follow the manufacturer's cleaning instructions.
Step 4. Dry the shirt
You can choose to air-dry it or put it in the dryer. Most of the ink will have come off your shirt at this point and you can use your fingernails to work on the reaming bits so that your shirt is completely ink-free.
Quick Tip: Repeat the entire process if you notice the ink hasn’t yet come off your shirt. But don’t repeat this method too many times as the plastisol remover can damage your shirt. If this method doesn’t seem to bear results after 1-3 tries, move on to the other alternative methods below.
2. The Nail Polish Remover Method
You might probably have heard about removing screen print ink from your cotton t-shirt using acetone.
Well, the nail polish remover in your home works great for removing the ink because it contains the acetone compound.
The said compound acts on the ink to remove, plus it’s friendly to cotton fabrics.
Below is our guide on using nail polish remover:
Step 1. Wash the shirt with cold water
You first need to wash the shirt in cold water as fast as you can to help wash off the new printing ink and keep it from solidifying any further—the more it sets it, the harder it becomes to remove. You also don’t want to use hot ink because it can increase the ink stickability on the t-shirt.
Step 2. Put the shirt in the dryer
Now dry the shirt using a high heat setting. This setting will help loosen up some of the ink from the shirt, which you can then peel off with the help of your hands.

Step 3. Apply nail polish remover on the ink
High heat doesn’t loosen up all the ink, and that’s where you use the nail polish remover to finish the process. Apply this polish remover on a cotton swab/ball and then use it to dab on the remaining ink. be sure to apply a little force as you do it. But don’t rub the cloth as you can easily mutilate by doing so.
Use your fingernails to peel off the ink as it comes off the shirt.
Step 4. Rewash the t-shirt
At this point, almost all the screen print ink has come off. You’ll need to wash the shirt again, this time following the manufacturer recommended washing instructions. Afterward, dry it using the high heat setting and peel off any remaining bits of ink from your shirt. And you’re done!
Step 5. Making final touches
If you followed the above procedure correctly, all of the ink on your shirt should have come off. But this isn’t always the case. So, if you notice some ink still showing on the cotton shirt, consider repeating the above removal process, from Step 3 until you get rid of all the ink on the cotton.
3. Blow it out with a Spot Removal Gun
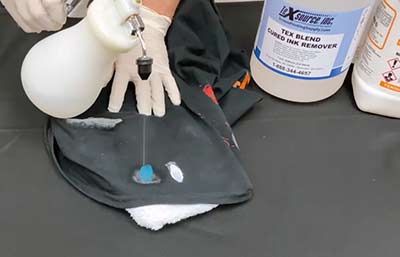
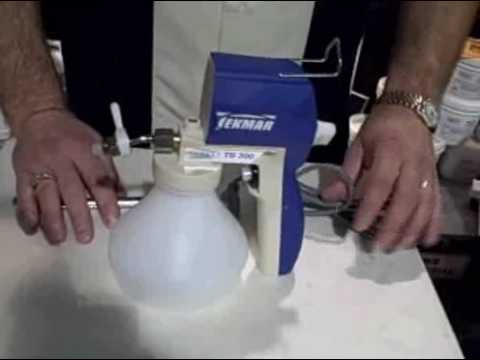
Another method you can use to remove ink screen-printed on your cotton shirt is utilizing a spot removal gun. There are many such guns out there from different manufacturers to help you find a model that works for you.
What’s more, these guns are incredibly easy and fun to operate and are good at their job. The aggressive, direct penetration effect of this gun is the secret behind its high efficiency at clearing screen print inks off the shirts.
One more thing you should put on some gloves and safety goggles and conduct this method in a well-ventilated area because the ink remover contains hazardous chemicals.
This is how you use a spot gun removal:
Step 1. Load up your gun
You should start by loading up your gun with the spot remover liquid. To do this, simply open the container and fill it up with the spot cleaning fluid formulated for removing cured inks. Close up the gun and move on to the next step.
Step 2. Prepare the shirt for ink removal
Place the t-shirt on your spot cleaning stations such that the spots you want to remove are easily exposed for easy spraying. In case you don’t have a cleaning station, you can fold your shirt over a solvent-resistant plastic container to make it easy to work on.

Step 3. Spray the spot
Blast the exact area you want to remove ink and spray it with the liquid. Be careful not to spray other areas of the shirt as the liquid might end up staining the shirt.
Start with a sharp stream of cleaning fluid and spray it from a few inches away from the shirt—the distance should be good enough for precise shooting but not close enough to destroy your shirt.
After you’ve loosened the ink, you can now switch your gun spray settings to let you fan out the ink and additional residue off your garment.
Step 4. Wipe off the liquid
Now use a soft rag plus water to help wipe off the remaining liquid from the shirt. Make sure you completely wipe off all the liquid. Leaving any chemical residue behind can not only stain but also damage your shirt.
Step 5. Wash the t-shirt
Give your shirt a good cleaning, following the manufacturer's instructions. This is important to ensure you get rid of all the spot remover liquid. Lastly, air-dry the shirt in a well-ventilated area. That’s it.
Below is a visual representation of using a spot remover gun to remove cured screen parting ink from your cotton shirt.
4. Plastic Bag and iron Method
If you’re doing screen printing at home and you make mistakes, this is a good method for you to use to remove the ink.
The method is cost-effective and uses items that are already available in your home—a plastic bag and iron. You don’t need to spend on any additional supplies.
Here’s how to do it:
Step 1. Start by washing the shirt in cold water and then dry it using high heat setting
Step 2. Now placed the dried shirt on your ironing board or any flat, solid surface Place a paper bag on the shirt, right where the printed ink is. Make sure the glossy part of the plastic bag is sitting directly on your shirt.
Step 3. Iron over your bag using medium heat setting. The idea here is that the heat produced by the iron will help transfer the print from the shirt to the plastic bag
Step 4. Remove the bag together with the ink it has managed to “pull” out of the shirt. Use your fingernails or a plastic knife to scrape off the remaining ink from your shirt.
If all the ink didn’t come out. repeat the process severally with a different paper bag for each process, until all the ink comes off.
Conclusion
Mistakes are part of the screen printing process and anybody can mess up, including the seasoned printers. The most important thing is knowing how to fix the errors when they occur.
We have just shared with you 4 of the most effective methods of removing screen print ink from your cotton shirts. All the methods are cost-effective and easy to do for you. Try them out and see which one works for your cotton shirt.

![How To Remove Screen Print From Cotton Shirt [ 4 Proven Methods] How To Remove Screen Print From Cotton Shirt](https://beyond-press.com/wp-content/uploads/2022/01/How-To-Remove-Screen-Print.jpg)