If you’ve ever seen a small figurine, intricate jewelry piece, or a highly detailed model fresh from a 3D printer and wondered, “How on earth do they make that?” there’s a good chance it came from a resin printer. Resin 3D printing is not only fascinating to watch but also produces some of the finest details you can achieve in additive manufacturing.
Unlike filament-based printers (like FDM- Fused Deposition Modeling, printers that melt plastic filament layer by layer), resin printers use liquid photopolymer resin that hardens when exposed to specific light sources. This process can capture fine details that filament printing sometimes struggles with, making resin printers the go-to choice for miniature makers, dental models, prototypes, and high-precision parts.
In this guide, we’re going to walk step-by-step through how resin printing works, explain the three main resin printing technologies (SLA, LCD, and DLP), explore the types of resins available, and go through the entire process from choosing your method to post-processing the final print. By the end, you’ll not only know what resin printing is but also feel confident enough to try it yourself.
Understanding the Three Main Resin Printing Technologies
While the general principle of resin printing is the same curing liquid resin layer by laye, the light source and projection method differ depending on the type of printer. There are three main types you’ll encounter: SLA, LCD, and DLP.
SLA (Stereolithography) is the oldest resin printing method, invented back in the 1980s. It uses a precise laser beam that traces the shape of each layer directly into the resin vat, curing it point by point. This method offers incredibly fine detail and smooth surfaces, but can be slower since the laser needs to draw each layer.
LCD (Liquid Crystal Display) printers use an ultraviolet (UV) backlight that shines through an LCD screen. The screen acts like a mask, allowing light to pass only through the areas that need to be cured for that specific layer. Because the entire layer is exposed at once, LCD printers tend to be faster than SLA. They’ve become very popular for hobbyists because they are affordable and still offer excellent detail.
DLP (Digital Light Processing) printers also cure entire layers at once, but instead of using an LCD mask, they use a digital projector to cast the layer’s image onto the resin. This makes DLP printers very fast and precise, often used for professional applications where speed and accuracy are critical.
Each technology has its strengths. SLA offers the smoothest finishes, LCD strikes a great balance between speed, price, and quality, and DLP shines in speed and precision though it can be more expensive.
FDM vs Resin Printing: What’s the Difference?

Before diving deeper into resin printing, it’s important to understand how it compares to the most common 3D printing method: FDM (Fused Deposition Modeling). FDM printers melt a thin plastic filament and extrude it layer by layer to build the model. This method is more affordable, cleaner, and better for larger, less detailed prints.
Resin printing, on the other hand, works with liquid photopolymer resin. Instead of extruding plastic, it cures resin using light. This allows for extremely fine details, sharper edges, and smoother surfaces, which is why it’s preferred for small, intricate parts. However, resin printing requires more post-processing, like washing the prints in alcohol and curing them under UV light. It’s also messier resin is sticky, toxic in liquid form, and needs careful handling.
Think of it this way: if FDM printing is like building with LEGO bricks, resin printing is like sculpting in clay with a laser-guided chisel. Both are powerful tools, but they serve different purposes and produce different results.
Types of Resins Used in 3D Printing

Not all resins are created equal, and the type you choose will depend on your project’s needs. Here are some of the main categories explained in simple terms.
Standard resins are great for beginners. They are affordable and easy to work with, producing smooth, detailed prints. However, they tend to be brittle, so they aren’t ideal for functional parts that need to withstand stress.
Tough or engineering resins are designed to be more impact-resistant and durable. They’re a good choice if you need functional prototypes or mechanical parts.
Flexible resins allow for bending and compression, making them useful for rubber-like parts or wearable items.
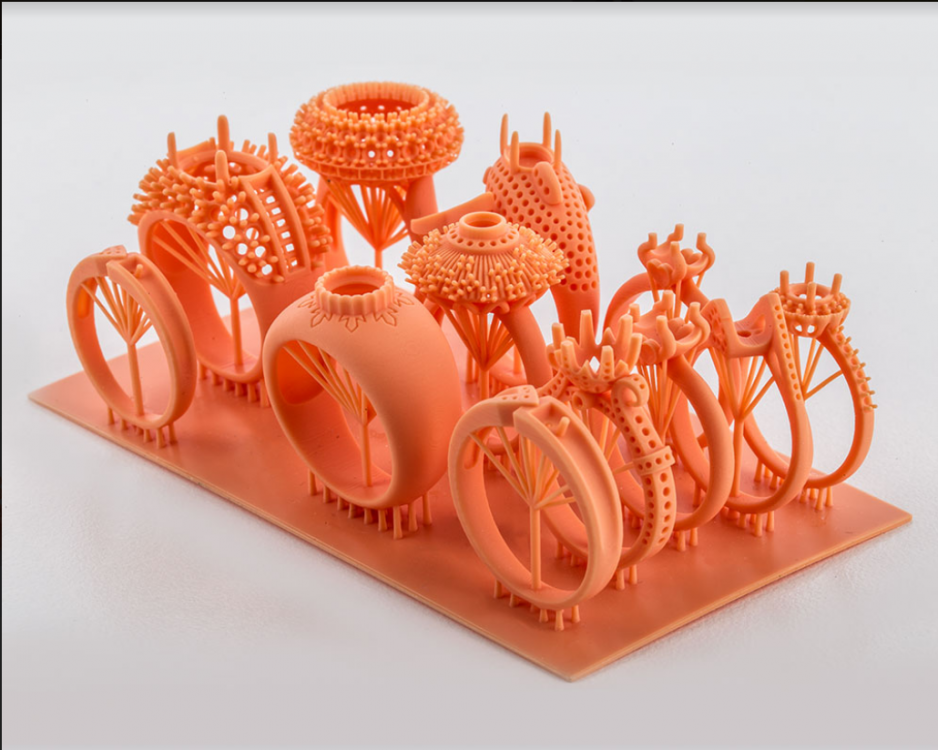
Castable resins are used mainly in jewelry and dentistry. They burn away cleanly during casting, leaving no residue.
Dental and medical resins are biocompatible and designed for specific professional applications like dental aligners, surgical guides, and implants.
High-temperature resins can withstand extreme heat, making them suitable for molds or components used in hot environments.
Choosing the right resin is a lot like choosing the right recipe for a dish, the ingredients you pick will determine the outcome. A tabletop miniature artist might love standard resin for its detail, while a mechanical engineer might opt for tough resin to test a part’s durability.
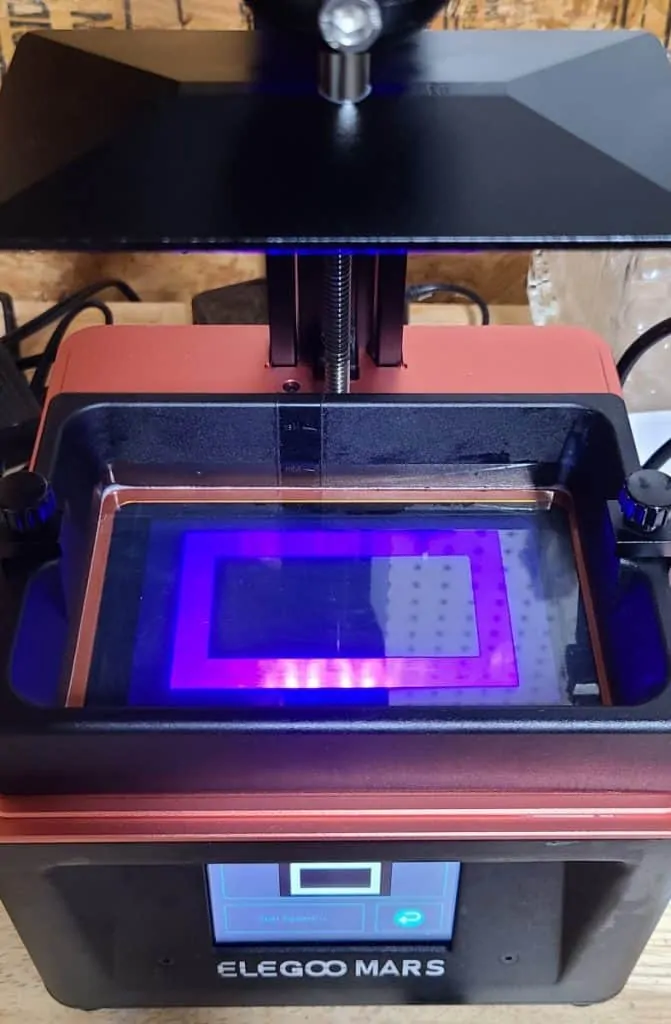
How a Resin Printer Works
Resin 3D printing is one of the most fascinating ways to create highly detailed models, miniatures, prototypes, and even functional parts. Unlike FDM printers, which use melted plastic filament, resin printers rely on liquid photopolymer resin that hardens when exposed to UV light. While it might seem technical, the printing process itself is logical and predictable once you understand how it works. Let’s break it down step by step.
Lowering the Build Plate
After loading your 3D file and pressing “Print,” the printer begins by lowering the build plate slowly along the Z-axis into the resin vat. The resin vat is filled with liquid photopolymer, which will become solid wherever the UV light touches it. The initial movement of the build plate sets the stage for a precise printing process — the first few layers need to adhere perfectly to the plate, so this positioning is critical.
At this stage, everything might look calm, but the printer is carefully preparing for the first exposure. The build plate must sit at exactly the right distance above the FEP sheet (the thin, transparent film at the bottom of the vat) so that the resin cures evenly without warping or detaching.
Exposing the Resin to UV Light
Once the build plate is in position, the printer turns on its UV light. In an LCD-based printer, the light passes through a patterned LCD screen that acts like a stencil. The LCD blocks light in areas where resin should stay liquid and lets it pass through where the layer should solidify.
For the first few layers, often called the bottom layers, the printer overexposes them intentionally. These layers typically receive 10–12 times longer exposure than normal layers to make sure the model sticks firmly to the build plate. Without this extra curing, the print could detach during the process, leading to failure.
Lifting and Lowering the Build Plate
After each layer is cured, the build plate lifts slowly, usually about 5 millimeters. This lifting step might seem minor, but it has two important purposes:
-
Peeling the layer from the FEP sheet: Even though the FEP film is non-stick, cured resin naturally adheres to it due to suction and surface tension. Lifting the plate gently separates the layer from the film without damaging it.
-
Allowing fresh resin to flow underneath: Once the layer is peeled, the resin in the vat fills the empty space below, ensuring that the next layer has enough liquid resin to form properly.
Once this is done, the build plate lowers back down into position, ready for the next layer to be cured.
Repeating the Process Layer by Layer
This sequence of exposing, lifting, lowering, and curing repeats for every single layer of the print. Depending on your model’s size and layer height, this could mean thousands of tiny cycles. The printer gradually builds the object from the bottom up, forming precise details that would be impossible to achieve with traditional FDM printing.
Every layer must cure perfectly, and each lift and drop must happen smoothly. If a layer fails to cure properly, it could affect the entire print. That’s why calibration and careful setup are so important for resin printing.
Post-Processing
Once the print is complete, it isn’t ready to touch or display just yet. The model will still be coated in uncured resin, which is sticky and toxic. Post-processing is essential to turn the print into a usable, safe object.
-
Removing the print from the build plate: Carefully detach the model using a scraper. Be gentle to avoid snapping delicate features.
-
Cleaning: Wash the print in isopropyl alcohol (IPA) or a dedicated resin cleaning solution to remove excess resin. Some hobbyists use a two-step wash to ensure the surface is completely clean.
-
Curing: Place the cleaned print under a UV light or in direct sunlight to fully harden it. Proper curing strengthens the model and prevents future warping.
-
Finishing touches: Remove supports, sand rough spots, and optionally paint or coat your model. Resin prints take primer and paint beautifully thanks to their smooth, highly detailed surfaces.
Step-by-Step Resin Printing Process : Overview
Resin printing might sound intimidating at first, but once you understand the steps, it becomes much less mysterious. At a high level, the process involves selecting your printer and method (SLA, LCD, or DLP), choosing the appropriate resin, preparing your digital model, slicing it into printable layers, setting up and calibrating your printer, actually printing the object, and then post-processing the print to make it ready for use.
It’s not as simple as pressing “Print” on your computer, but the process is surprisingly approachable once you know what’s going on at each stage. In the following sections, we’ll walk through each step in detail, with practical tips so you can avoid the common mistakes beginners make, like forgetting to level the build plate, under-curing a print, or skipping safety precautions.
Understanding resin printing becomes much easier when you walk through the entire process from start to finish. Let’s break it down into a logical sequence, just as you would actually do it in real life.
Choosing Your Printing Method
The first thing you decide is what type of resin printer to use: SLA, DLP, or LCD. SLA (stereolithography) is the pioneer in resin printing, using a laser to cure resin with high precision. DLP (digital light projection) instead uses a projector to cure whole layers at once, often resulting in faster print times. LCD (liquid crystal display) printers are the most affordable and accessible option for beginners; they use an LCD screen and a UV light source to solidify the resin layer-by-layer.
For someone just starting out, LCD printers are often recommended because they balance price, print quality, and availability of spare parts.
Choosing the Right Resin
Resins are the “ink” for resin printers, and their characteristics determine your final object’s look and performance. For example:
-
Standard resin is great for general-purpose printing and gives good surface detail.
-
Tough resin offers more durability for functional parts.
-
Flexible resin can bend without breaking, ideal for custom grips or wearable designs.
-
Castable resin is used for making molds in jewelry or dental work.
When choosing resin, you should also consider color, curing time, odor, and safety precautions.
Preparing Your 3D Model
Your printer needs a digital blueprint before it can start building. This blueprint comes in the form of a 3D model file (usually .STL or .OBJ). You can design your own model using CAD software or download one from online repositories. Before moving on, ensure that the model is watertight (no holes or gaps) and properly scaled to fit your printer’s build volume. This step is crucial, a poorly prepared model will cause failed prints and wasted resin.
Slicing and Printer Calibration
Once you have your 3D model ready, it’s time to make it printer-friendly. Slicing software like Chitubox, Lychee Slicer, or PrusaSlicer converts your 3D model into printable instructions. In slicing, you’ll set:
Layer height – Smaller layers give more detail but increase print time
Exposure time – How long the resin is cured per layer
Supports – Structures to hold overhangs during printing
Lift speeds – How fast the build plate moves between layers
After slicing, save the file in your printer’s format (e.g., .ctb, .photon) and load it onto the machine via USB or memory card.
Resin printers can’t read your design directly; they need a “sliced” version that tells the printer exactly how to build it layer-by-layer. You do this using slicing software such as ChiTuBox, Lychee, or PrusaSlicer. The slicer allows you to set important parameters like layer height (thinner layers mean more detail but longer print times), exposure time (how long the UV light cures each layer), and support structures (to prevent the model from collapsing mid-print). Support placement is a small art form in itself too few supports and your print will fail, too many and post-processing becomes tedious.
Before printing, your resin printer needs to be properly calibrated. This usually involves leveling the build plate so that the first few layers adhere perfectly to the surface. Many beginners underestimate this step, but a slightly tilted plate can ruin an entire print. Most modern printers have step-by-step on-screen instructions to help you level the plate and test exposure before committing to a large print.
Printing Your Model
Once the slicing is complete and your printer is calibrated, the fun begins. Printing with resin isn’t as simple as pressing a single button, but it’s a surprisingly straightforward process once you’ve done it a couple of times.
First, pour the resin into the printer’s vat. Most vats have a maximum fill line — never exceed this, as overfilling can lead to messy spills and wasted material. Gently stir the resin with a clean stick to ensure it’s evenly mixed, especially if you’ve been using the bottle for a while. Then, start the print job from the printer’s interface. The build plate will lower into the resin, and the curing process begins. With each cycle, the light source cures one layer of resin, and the plate lifts slightly before lowering again for the next layer. This layering process continues until the entire model is complete.
Depending on your print’s size, this process can take anywhere from 30 minutes to more than 12 hours. Unlike FDM printing, where you can often see your model taking shape in mid-air, resin printing hides the build beneath the resin surface until the job is finished. This makes it a little more suspenseful, you won’t truly know if everything worked until the print emerges from the vat.
Post-Processing: Cleaning and Curing
When the print is complete, it will be coated in uncured resin, which is sticky and toxic until fully hardened. This is where post-processing comes into play, and it’s an essential step in resin printing.
The first thing you do is remove the model from the build plate, usually with a scraper. Be careful here — resin prints can be delicate, and too much force can break small features. Once removed, the model needs to be washed in isopropyl alcohol (IPA) or a dedicated resin cleaner to remove the sticky resin residue. Some people use a two-bath system: a first bath to remove most of the resin, and a second, cleaner bath to ensure the surface is completely free of any uncured material.
After cleaning, the model still isn’t ready to use. The resin has only been partially cured by the printer; it needs additional exposure to UV light to reach full strength. This curing process can be done with a purpose-built curing station, a DIY UV light box, or even direct sunlight (though the latter can be inconsistent). Proper curing not only improves strength but also helps prevent warping over time.
Removing Supports and Surface Finishing
If your print had supports, now is the time to remove them. Supports are easier to detach after curing slightly but before the print becomes completely rigid. Use flush cutters to snip them away cleanly, being careful not to gouge the model’s surface.
Once the supports are gone, you might find small nubs or imperfections where they were attached. Light sanding with fine-grit sandpaper or a rotary tool can smooth these spots. If your project demands a pristine surface, you can prime and paint the model afterward. Resin prints are excellent for painting because their high detail and smooth finish take primer and paint exceptionally well.
Safety Considerations
Resin printing involves chemicals and UV light, so safety should never be an afterthought. Always wear nitrile gloves when handling resin, even during post-processing, to avoid skin contact. Safety goggles are a good idea when pouring resin or working with alcohol baths, as splashes can happen unexpectedly. Ensure that your workspace is well-ventilated; resin fumes, though less intense with modern formulas, can still cause irritation over time. And remember: never pour leftover resin or contaminated IPA down the drain — it should be cured first and disposed of as solid waste.
Common Mistakes Beginners Make
Many newcomers to resin printing encounter the same pitfalls, so it’s worth being aware of them from the start.
One of the most common is over-relying on default slicer settings without adjusting them for your specific resin and printer. Exposure times that work perfectly for one resin brand may fail for another. Another frequent mistake is neglecting to stir resin between prints; pigments and additives can settle, leading to inconsistent results. Improper leveling of the build plate is also a notorious culprit for failed prints.
Some beginners also underestimate the mess and space requirements of resin printing. Between resin bottles, alcohol baths, paper towels, and UV curing equipment, you’ll need a dedicated workspace that can handle occasional spills.
Conclusion
Resin 3D printing opens the door to a level of detail and smoothness that traditional FDM printing struggles to match. It’s the go-to choice for miniature makers, jewelers, and creators who want intricate, high-resolution parts. While the process may seem intimidating at first , with its need for slicing software, printer calibration, resin handling, and careful post-processing — each step becomes second nature with practice.
The key to mastering resin printing is patience. Unlike some manufacturing methods where you can rush through the workflow, resin printing rewards slow, deliberate preparation. The more time you invest in properly preparing your model, setting up your printer, and following through with post-processing, the more satisfying your final results will be.
Whether you choose SLA, DLP, or LCD technology, the principles remain the same: prepare carefully, print with precision, and finish with care. For hobbyists, it’s a path to stunning creations; for professionals, it’s a tool for producing parts that simply can’t be made any other way. With the right approach, resin printing can take your projects from rough ideas to detailed, tangible works of art.